Saturday 31 July 2010

How to Nom on bosses! (aka how to be a cat!)


At long last, I've finished and posted my guide to feral dps! Rather than spam the main page like I did with my Resto guide (which I also partly did to give a few extra posts for the launch of the blog), I published it straight to my pages section (all my Pages are listed on the right-hand side of the blog).

You can find the full guide here: How to be a Cat!

For those who may be following the blog through google reader or RSS feed and haven't spotted the list of pages on the main site, you can also find the full Tree guide here: How to be a Tree!

I will also be compiling the posts of healing guides into one page as new ones are posted to make it easier to access them all. They'll all be linked at the list here.

Enjoy!


Guardian of Cenarius

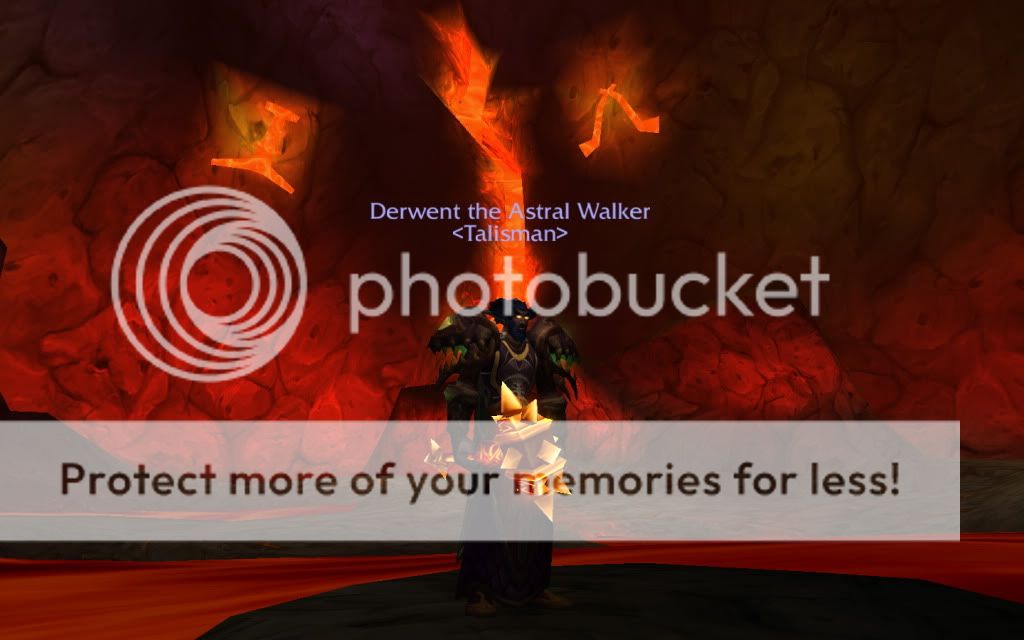
I've just about completed my Cenarion Raiment set (only missing the boots), but the robes finally dropped so it looks complete nevertheless!


The Cloak of Unending Life from the AQ20 quests (made with the Idols, Scarabs, and drops in AQ20) matches it perfectly too. I don't have the best weapon for it (something like Dreambinder would probably be fitting), but it's quite fun using my Sulfuras with it, even if it does look a bit out of place.


I had a ton of fun healing a few randoms in the gear, so I may start doing that now to liven up my daily LFG (though if I get any of the ICC 5-mans I'd have to pop my proper gear back on).

I think this is one of my favourite tier sets - I love the leaves and twigs, and it just looks very much like something I'd imagine a druid would wear. If any tier set model were to be revived in Cataclysm or later, I would definitely hope it would be this one. The Cenarion Expedition tabard goes quite well with it all too, and the Guardian of Cenarius title just tops it off. Altogether it makes a really great druid set!

Wednesday 28 July 2010

User Interfaces

I thought I'd make a post about my UI, to show some useful things both for healing and dpsing and perhaps give some ideas for those personalizing their UIs.

I had a friend suggest making a UI package for people to use, so I'll likely try to set that up, especially if there's interest. I'll try to do that ASAP, I need to look into the best and simplest way to set that all up (and likely write some info on setting up the included addons).

What follows are what I'm using at the moment. My basic interface is still the Blizz standard - I personally quite like the party/target frame setup at the moment. I also got very accustomed to using the default action bars, particularly once I set up a hotkey system that made good sense to me. I did prefer to scale everything down, though, reducing the action bar and user frame sizes significantly. This cleared up a lot of space on my screen (and is one less addon to worry about as well). You can do this by going to Menu - Video - Resolution; tick 'Use UI Scale' and adjust the slider from Low to High to adjust the size of all of that.
I use all the action bars. Go to Menu - Interface - Action Bars and tick which ones you want (bottom left, bottom right, right 1 and 2).

For basic raid standards I have Recount (including RecountGuessedAbsorbs, which is useful for measuring Disc bubbles in fights), Omen, oRA2, and Deadly Boss Mods.

I use Parrot for my scrolling combat text. I particularly like Parrot as it shows stickies for crits and can show cooldowns/procs/etc as well which can be useful additional reminders. The only time I have to disable it is when raiding on my tanking toons, as there's simply too much incoming information (between incoming and outgoing damage and heals) that I end up having difficulty seeing, and I don't want to miss seeing a stray add or something similar.

I use Quartz for cast bars.

I also have FuBar, which I find is useful for various things (DualSpecFu for swapping talents, GuildFu and FriendFu for seeing friends, NameToggleFu for quickly turning names/guild tags on and off (useful for screenshots), DurabilityFu for keeping track of repairs, and some others).  (Note - I had to do some fiddling with FuBar at the Halion patch, as I don't believe it's currently being updated. To fix it I believe I went into the addon file and pulled its Libraries out of the FuBar folder and just straight into the general addons folder. This made it easy to update the Libraries (using Curse's client), which got FuBar functioning again with the patch).

I use SexyMap simply for cosmetics, my druid has the 'Emerald Portal' map, and I tend to put different maps for each toon. I also use TipTac for tooltips.

I'll start with a shot of my kitty setup to show some useful addons for feral.

(Click the screenshots to see them full-size - you can also pull them up in a separate window that way).

The main addons of note here are Rogue Power Bars, Power Auras Classic, and ArcHUD.

Rogue Power Bars are the bars just below my toon showing my buffs and debuffs. This is an excellent way to keep track of all your buffs and debuffs as cat, which are crucial in your rotation. As you can see, the timers are keeping track of my Savage Roar, and of my Rip, Mangle and Rake on the target. You can also set it up to track your Berserk timer (I didn't pop Berserk for this shot so you could see the Power Auras, which I'll get to). You can also enable it to track other's debuffs, particularly Mangle (cat), Mangle (bear) and Trauma (arms warrior), which is very useful if someone else is the Mangle-bot so you know you're safe to keep on shredding instead of refreshing the debuff.

Power Auras is showing a few things in that shot. You can see my Tiger's Fury is ready (the tiger icon below my toon), Berserk is ready (to the right of the three icons), and in the centre is my Omen of Clarity  notification (which also makes two blue arcs around my toon). Power Auras is great for tracking spell cooldowns (like Berserk) or for notifying you when you gain buffs or procs (like OoC). Especially in cat, at OoC procs I try to get in another free shred, so it's crucial to see that it's available. The red ring around my toon is showing me that Predator's Swiftness is up. I mainly use this when PVPing as feral (though it has its uses in PVE), I also have it make a loud raid warning sound, so I know that the proc is up and that I can get an instant spell off (an instant Cyclone most likely in PVP, perhaps an instant Rebirth in PVE).

The last main one there is ArcHUD, which shows both my HP (and in this case, my energy), the target's HP, and, nicely for cat, it shows my combo points on the target. I like having all of these things centred around my toon so I can keep an eye on my combo points, my buffs/debuffs, my spell cooldowns, and all the while still be watching my toon and my feet (so I can avoid fire).


Now onto my Tree UI, which I'll also go over some of the raiding addons as well (I raid primarily as Tree).


Here again you can see Power Auras and ArcHUD. Rogue Power Bars is still on, but I disable the 'Track Other's Debuffs' while healing as it would otherwise get in the way of my healing frames.

I'll touch quickly first on Power Auras since I've already explained it above. In resto, I use it to track my Nature's Swiftness cooldown so that I know when it is available. Again, Omen of Clarity is set up as well. My last one is for Wild Growth to show me when it's available for use.

Along with Deadly Boss Mods (DBM), I also downloaded the additional DBM Spell Timers. You can see some of the timers it tracks on the upper right - I can see all the Misdirects and Tricks of the Trade that have just been cast on this initial pull. This is particularly useful for tracking Battle Rezzes and Innervates - with just a glance I can see whose Battle Rez is available and, if I'm desperate for mana I can ask for an innervate, or if I see another druid is desperate for mana and has already used their innervate, I can toss them mine.

The primary addon of note here though is Vuhdo (all the green bars dead centre). I use this addon to heal (though I've grown to love it so much that I now use it on all of my toons, including non-healing ones, as raid frames).

Vuhdo has been my favourite addon to use both for healing and otherwise. It's very customizable and easy to setup, so it's easy to get started with it and get it looking exactly how you want it to look. I personally like using the green bars (if you've seen either the Sindra or Halion videos I posted, you can see how they shift colour as people get low in health). It's also an extremely informative addon. Symbols will pop up on it at certain debuffs (which you can also customize if you do or don't like them), such as Icetomb targets on Sindra, Vile Gass on Festergut, Bone Spikes on Marrowgar, Incinerate Flesh on Jaraxxus, so forth. This is one of the primary reasons I use it as raid frames on all of my toons - I can easily see what's happening to everyone in the raid at any given time by just glancing at it.


It has several nice things for druids (and other classes). For druids, you can activate the setting to see when Swiftmend is available on a target (the red dot on the bar in the screenshot above is indicating Swiftmend is available). This is great for several reasons - for one, it will show you that your Swiftmend is off cooldown and ready to use. Secondly, this lets you see when Swiftmend is available on a target affected by another druid's HoTs (without needing indicators for others HoTs). With that, I can easily see any Swiftmendable target.

In that shot there, I've loaded myself fully with HoTs so you can see the indicators. I use the little HoT timer dots in Vuhdo to track mine. On the bar, moving around, top left is my Rejuv, top right are my Lifeblooms (additional stacks will cause the little square marker to change colours), bottom right is my Regrowth HoT, and bottom left is my Wild Growth.

You can also see the Quartz castbar for myself.

The best thing with using Vuhdo (or a similar addon such as Healbot) is I never have to target a person to heal them if I don't want to (though this can also be done with things such as mouseover macros). This leaves me free to target whomever I feel like; the boss, to keep track of its HP percentage perhaps, a specific tank perhaps, a Kinetic Bomb that's looking neglected in Princes, etc. Back when I took my first foray into healing (in 5-man dungeons while leveling) I tried the simple Target person taking damage, heal! I found this really slowed my reaction time, though. That is probably the biggest advantage to using an addon like Vuhdo - my reaction times are much better, which is particularly crucial in raids. In the seconds it would take to target someone taking damage and then heal them, they've likely already been healed by someone quicker. Since I no longer have to target anyone, I can directly and quickly heal them with Vuhdo.

Vuhdo also has a Buffwatch which is nice to use. You can set it to either Smart buff (automatically use group buffs when x amount of people are missing the buff, or use the single buffs when only 1 or 2 are missing the buff), always Group buff, or always Single buff. This is nice pre-pull for buffing to ensure everyone is buffed. You can also set specific targets - Thorns, for example, you can set to track always the tanks, or just yourself, or everyone. It also shows the time remaining on your buffs and who's low.

You can also set up different profiles for different specs on the same toon, so you don't end up running out of bindings to use, or if you have different spells. I use this primarily on my priest (who is Disc/Holy, I use the same binds for Penance and Circle of Healing and Pain Suppression and Guardian Spirit) and on my Paladin (mainly so I can have Righteous Defense up in his Prot spec but make sure it's not keyed up in his Holy spec). There are also configurations for working with Clique and with Pally Power should you choose to.

It's nice that Vuhdo can help you watch for some incoming damage (showing instantly who is marked for an Iceblock on Sindragosa, for example, so you can toss a HoT or heal on them), however, it's no substitute to knowing the fight and being aware of your surroundings! Knowing/learning the incoming damage you can expect in fights, seeing when raiders are in hazardous spots, and listening to your raiders, particularly your tanks (who may be calling for Cooldowns, or announcing that they're out of cooldowns to mitigate damage), will all help your healing tremendously.

Also, a note; under the 'Spells' tab on Vuhdo is a SmartCast configuration. I do tick Smartcast for rezzes/battlerezzes (makes BattleRezzing that much easier/quicker, I can get someone up instantly if necessary), however, I turn OFF (untick the box) for cleansing and buffs. The smart cleanse will basically instantly cleanse/decurse someone when you click their bar. You will likely NOT want to have this on - on a fight like Halion, it will likely result in you cleansing someone too early. It will also mean instead of healing the person (if that's what you tried to click the bar to do), you will cleanse them, which may end up meaning they're cleansed... but dead.

Some last things of note on my UI. 
Chat boxes: I don't use any chat addons (though many use Prat), I do like to separate some things out of my primary chat window though. In the last screenshot you can see that I've moved all my system messages (rolls, announcements of people logging, etc) into a seperate, smaller window in the bottom left of my screen. This is to prevent these messages from spamming my chat window (up where I've said HAI in guild hehe) so I don't miss anything important said in Guild, Raid, or in our role-specific channels during raids.

For my action bars - although I'm normally using Vuhdo for my heals, I still have my healing spells (and some others) keybound for easy use should I need to use them at any time. Particularly on a fight like Valithria, if I'm healing the dragon, I tend to prefer to use a macro to /tar and /focus her to bring up a bar on Vuhdo to track my HoTs, but heal her directly. My Nature's Grasp and Barkskin are hotkeyed, as well as lockrocks, manapots, Cyclone, etc.


Hm, this ended up being a much more involved post than I had anticipated!
I'll see about setting up a UI pack, and can go into detail in an accompanying text file for how to actually set things up/customize the addons.

Feel free to leave any comments with questions!

Monday 26 July 2010

Shared Topic: A Picture Tells a Thousand Words

I'm excited by this week's Shared Topic on Blog Azeroth, 'A Picture Tells a Thousand Words' by Nuniel. I love taking pictures, both with my proper camera and in WoW, and consequently my Screenshot folder is packed with thousands of shots. I think the hardest part for me on this topic was simply deciding which one to share!

I finally decided on this one:

A Candle for the Fallen

I only came across this location recently - Dreadmist Peak in the Barrens. I had never done any quests up here, though some of you who quested in Kalimdor may remember it. It is quite a remarkable place... as you climb the peak, you leave the sunny savannah of the Barrens behind and enter a thick, dark, foggy atmosphere tinged umber and gold as the sun pierces through the haze. As well as the occasional tallstrider, you will find Burning Blade cultists who have infested the top of the peak. You can find spots on the peak that are still uninhabited, though, or do some cleansing of your own to reclaim the peak from the cultists.

I found this candle on one of the peaks, and hence decided to label this shot as 'A Candle for the Fallen'. A last candle lit under a setting sun for all those who have fallen and been lost.

Sunday 25 July 2010

By fire be purged!


I've finished my mace! Two xpacs behind, but no matter, I'm still very happy to have made it. :D

I'm tempted to use it in randoms, probably while healing and just run up to mobs and smack them with it, though the drop in stats is quite significant so perhaps I shouldn't if I want to maintain a (reasonable) level of contribution to the group. Perhaps I'll use it on the occasions I get overgeared tanks so it's safe to have the drop in spellpower.

I'll be continuing to go into Molten Core both for rep (Hydraxian Waterlords and Thorium Brotherhood from the Lava and Fiery Core turn-ins) and to finish off my t1 set (The Cenarion robes just will not drop! I only need the Robes and Boots now.). I'm quite tempted to head in on my Pally now, though, and try to get the pieces for Thunderfury, as that weapon is awesome. I've seen some tanks use that in randoms and it looks like a lot of fun. We shall see though!

Here's a bit of interesting information from WoW Wiki on Sulfuras:
Sulfuras is the mighty weapon of Ragnaros the Firelord. The weapon never leaves his grasp. It is composed of flaming red elementium and etched from end to end with intricate runes that seem to move like flowing lava across the weapons surface. Sulfuras is covered with many vicious pikes of varying sizes, each white hot and surrounded by the distortion of shimmering heat.
When a creature is slain by Sulfuras, its body is consumed by intense flame and effectively disintegrated, leaving behind only a pile of ash. The heat and pressure of this effect solidifies the ash into a hard, dark, crystal. This crystal is known as an eye of Sulfuras and is used by Ragnaros' followers in ancient rituals or to craft special weapons such as sulfuron hammers.

How to fully opt out of RealID

I noticed this article on WoW.com, it tells you how to fully opt out of RealID (and also how to customize it if you do want to use it). Article here. I'm very glad they posted this!

Quoting the article:
This is a guide for how to truly opt out of this feature...

To be clear, everyone who does not have a parentally controlled account has in fact opted into Real ID, due to a security flaw. Addons have access to the name on your account right now. So you need to be very careful about what addons you download -- make sure they are reputable. In order to actually opt out, you need to set up parental controls on your account. This is not an easy task. Previous to the Battle.net merge, you could just go to a page and set them up. Done. Now, you must set up an account as one that is under parental control. Once your account is that of a child's (a several-step process), your settings default to Real ID-disabled. Any Real ID friends you have will no longer be friends. In order to enable it, you need to check the Enable Real ID box.

Setting up parental controls:
Go to the appropriate battle.net site for your region. (That link should take you there.)
Push the Create or Manage a Battle.net Account button.
Log in as normal.
Click on Parental Controls, which is an option listed under Manage My Games. (And, if you're like me, you'll be sad that you are still not in the beta.)
Choose the No - Setup Parental Controls button.
Fill in your info as both the child's account and your own. (Why they make this distinction, I don't know. Parental controls always used to be an option for adults to manage their own game time.)
You will receive an email. You need to save this email, because the link in there is the only way to get to the parental controls. Otherwise, you have to make Blizzard resend it. Click the link to get into the controls.
Save Settings and then be told it will take up to 30 minutes to go into effect.
That is how to opt out.

It says that it's not easy to set up parental controls, but it only took me about 5 minutes total to do all of that, so really not that bad. It looks like it works well - logged in to test it and I didn't see any of the RealID setup settings in the Interface menu or the Social tab. Seems to have done the trick! 


I think it would be much better if this was standard across all accounts (not just in parental controls); what would be best is an Opt-in setup where you're automatically out of RealID until you select that you want to activate it. That would be the safest for privacy, really. At least Blizz listened to the community and decided to cancel their plans for using RealID on the forums.

Saturday 24 July 2010

The flaw of mortality! Healing Sindragosa

I was playing with improving the video quality on my recordings (got them to HD, but they seem to still be lacking sharpness when uploaded to youtube) and did one of Sindragosa, so I thought I’d write a guide on healing Sindragosa to go along with it!
Once again, full detailed information on the encounter mechanics are best found at a place like Tankspot. There are many different strategies for dealing with the Iceblocks both in the air phases and in Phase 2 - go with whichever one works best for you and your raid team!

I grabbed the video the other night while we were clearing ICC. This is the 25 man Heroic version of the encounter. One of the key differences on heroic from regular mode is the Unchained Magic debuff causes an arcane explosion when it ticks off of a target. In phase 1, anyone afflicted should move out of the group to avoid exploding on the entire raid (you’ll see me have to do this in the video). In phase 2, those afflicted will ideally stop casting, as the raid will be grouped up by the ice blocks. You may prefer to have anyone afflicted stop casting both in Phase 1 and 2 - that’s down to your preferred strategy.
It is even more important on heroic mode to have a strong healing team that works well together and can rely on each other. You’ll have to watch your fellow healers’ backs; if any of them are Iceblocked or get Unchained Magic in phase 2, you will need to help them out and cover when they have to stop healing.
I personally find this encounter to be quite fun, especially while healing it as a druid! 
Phase 1:
A druid’s HoTs are brilliant for dealing with the ticking aura damage in this fight, particularly in phase 1. 
Healing phase 1 is quite straightforward. If you’ve got some solid dedicated tank healers in (a couple of pallies most likely), as a druid you’ll likely be able to focus mostly on the raid. I always like to keep an eye on the tanks while covering the raid, though - at least a Regrowth and a Rejuv kept up on the tanks at all times is very helpful, and be ready with your Swiftmend and Nourish to boost the heals on the tank if it’s needed. Also be ready in case your tank healers get Unchained Magic!
Your Rejuvs and Wild Growths will work wonders on topping up the raid. Targeting your Wild Growth on the melee will be a helpful extra boost on them, particularly for those who have let their Biting Cold debuff get too many stacks.
Your main nuisance in phase 1 will likely be Unchained Magic, particularly on Heroic. Be ready for quick big top-ups should anyone have their explosion go off in the raid. Sindragosa’s death grip of the raid is a particularly risky moment - this will often come while Unchained Magic is still affecting raid members. This is the most likely time that you’ll have explosions going off amongst the raid as people are sucked in with the debuff still ticking. If people are quick, they’ll be able to throw in a cast or two to extend the debuff before it falls off and explodes (I’ll usually toss a quick Lifebloom or Wild Growth if I get in this situation). If not, though, you’ll end up with some going off and raiders needing some big heals.
Iceblocks: You can’t heal a target once they are iceblocked, BUT, HoTs WILL continue to tick on targets that are Iceblocked. It is immensely helpful to get at least a Rejuv or another HoT on players targeted for Iceblocks. The iceblocks will cause some damage when they hit, so your HoTs will tick on the players and heal them up while the rest of the raid is working to free them. Having the player topped up inside the Iceblock also gives crucial extra time should your raid be slow on freeing them and the player begins to suffocate.
A note for other healers: Priest’s Renew and Shammy’s Riptide are helpful if you can get these on players as well, and a Disc priest’s Bubble is very helpful for negating much of the initial Iceblock damage too. 
There ideally is minimal to no healing required during the air phases as the entire raid should be LoS’ing every frost bomb. The frost bombs will one shot any player on Heroic, so it’s best your raid practices avoiding every one on regular as well.
Phase 2:
Phase 2 begins when Sindragosa hits 35% health.
This is where the fight becomes trickier to heal, as you now have increased damage on the entire raid and tanks due to the Mystic Buffet debuff. It’s very important your raid members watch their stacks of Mystic Buffet and LoS Sindragosa to let the stacks drop off. Your tanks also need to coordinate well so that their stacks will drop too - if their stacks get too high, they risk getting one-shot by Sindragosa’s frost breath.
Phase 2 requires a lot of coordination and awareness from every raid member. Healing strategy will be similar to Phase 1, but much more demanding due to the increased damage. 
It is important to be on your toes in Phase 2 and be aware and communicating with your fellow healers - you need to be ready to switch from raid healing to tank healing (or vice versa) at the drop of a hat should your other healers get Unchained Magic or Iceblocked. It may help your raid to run more healers than they might otherwise (particularly on heroic) to help provide backup should any of the healers be unable to heal.
Iceblocks are crucial in Phase 2 so the raid and tanks can drop their Mystic Buffet stacks, so topping up Iceblock targets is very important. Because the iceblocks cause damage when they hit a target, if a player is too low on health they risk dying when struck, and your raid will lose an iceblock. If I see an iceblock target is low on health, I’ll pop a Regrowth on them to heal them up and apply the HoT to heal them up in the block.
You shouldn’t run into Line of Sight issues while healing the raid in this phase, as the majority of the raid will likely be with you behind the ice blocks to Line of Sight Sindragosa. You may run into issues when covering the tanks, though. You only need to LoS the centre of Sindragosa to drop the Mystic Buffet stacks, so, depending on your choice of Iceblock strategy, you may find you can stand in such a way that you will still LoS the boss but have access to your tanks. If you cannot do this, though, you may have to carefully pop out between blocks to heal. Again, communicate with your fellow healers!
All of phase 2 is a delicate balancing act between keeping the raid topped up and healing the tanks. Remember, coordination and communication is key!
Good luck and have fun!
Feel free leave comments with any questions you may have on the encounter.

Wednesday 21 July 2010

Relish this victory, mortals, for it shall be your last


Halion 10man heroic is down! I stupidly forgot to fraps it, so I sadly do not have a video, but I'll try to remember to grab it next week. We'll be working on 25m heroic this week and will hopefully be seeing a kill shortly! Phase 3 is the clincher - apart from good coordination in the Twilight Realm to avoid the cutters and good communication by your dps to keep both realms balanced, the combustion/consumption void zones are really critical. The worst we found was when two randomly ended up being placed on top of each other - the combined damage from both zones and the slow from the consumption zone was a serious killer.

Once getting the coordination down, we next had to avoid the enrage timer (which is 8 minutes). Popping heroism at the very start of the fight to push into phase 2 bought us some crucial extra time which gave some leeway when either the Physical or Twilight realm had to slow dps to even out Halion's corporeality in phase 3. As the healing is so light in phase 1 on 10 man (no adds in 10 man heroic), the healers threw in some dps as well to help push it. The timing of starting phase 3 also seemed to matter with shaving extra moments off - the faster we were able get the Physical Realm team up and dpsing, the easier it was to keep both realms balanced right away and push to the finish.

One last screenshot with the Heroic skull on the portal :D Difficult to keep both Halion and the portal in one shot, but you can see him up ahead in this one.

Staving off pre-xpac boredom!


Apologies for being slow on updates these past few days, been very busy!

It seems pre-xpac syndrome and summer are both kicking in and many people are finding themselves bored and wondering just what to do til Cataclysm drops. So, with that in mind, I thought I'd make a post with some ideas of things to amuse yourself!

For those of you still raiding, hopefully Ruby Sanctum has provided you with a fun diversion from ICC. If you're still looking for more to do raid-wise, this can be a fun time to revisit some of the lower Wrath content, particularly if you have an interest in achievements. Some achievements especially you will likely find much easier as most will overgear the content, so this may be an ideal time to grab some of the ones that were more difficult.

The Glory of the Ulduar Raider 10 and 25 in particular are good achievements to go back and get. Ulduar was, in my opinion, one of the best Wrath raids, as many of the encounters were a lot of fun and interesting, and the entire lore and history to the instance is pretty intriguing. Most of the quests in Storm Peaks are connected to the instance, particularly the Sons of Hodir chain (for those who didn't complete the chain, it is why Thorim says 'I remember you... in the mountains...' and the previous life of Razorscale). Many of you will likely have seen the Rhonin roleplay in Dalaran announcing the defeat of Algalon the Observer. The Algalon fight, both conceptually and in the fight itself, is a brilliant battle with a very interesting concept around it. If you were unable to attain the key to Algalon before, now may also be a good time to do the quest (opened from a drop off of Iron Council hard mode) to attain the key, as the Keeper hard modes will likely be easier now (though Firefighter can still cause trouble for some! Keep out of fire :D ).
Someone also made a very good youtube film on Ulduar, worth checking out!: Ulduar: The Movie, Part 1 (and Part 2 and Part 3).

There are many other achievements to check out as well, from undermanning instances (8- or 20-manning raids) to speed kills. Don't forget mount drops as well - Sarth+3drakes drops the Black Drake (10) and Twilight Drake (25), Eye of Eternity 10 and 25 drop the Azure Drake, and Onyxia 25 drops the Onyxia mount.

Old raids can provide a lot of fun as well, especially if you missed out on some of the BC raids.


If raiding isn't your thing, there's plenty of other things to do!

With all of the upcoming changes to Azeroth in Cataclysm, now is a great time to check out the quests in the Old World. This is something you could do on your main, particularly if you'd like to get the Loremaster achievement at some time. This can also be a great time to level an alt and perhaps try a new class. I usually find myself hitting the same zones when leveling alts, so it might be interesting to check out some of the areas you missed last time around! A lot of quest lines will be changing or disappearing altogether, including some of the unique rewards (though I do not know which ones), so if there's any ones you'd particularly like to get, go for it now. Two rewards in particular would be good to snag now in case they disappear: Dartol's Rod of Transformation, from the Raene's Cleansing chain in Ashenvale, and the Sprite Darter Hatchling chain in Feralas.

If you've primarily played either Alliance or Horde, this might also be a fun time to check out the leveling experience for the other side. Having played primarily Alliance toons in my time in WoW, I've had some fun recently in leveling a horde toon. Some of the quests sync up in the contested zones - for those of you Alliance in Southshore who remember dealing with the Forsaken plague threat, you may have fun in Tarren Mill as a Horde administering that plague to the poor farmer's dog!


This can also be a fun time to work on Reputation with various factions, particularly ones with mounts. Depending on your server, you may find this easy or hard to do; Timbermaw/Frostsaber rep out in Winterspring, for example, can be difficult if too many are there farming the mobs.
Outlands has several rep factions which reward mounts as well. The Netherwing quests are a great one with an assortment of cool drake mounts at Exalted. Depending on your time input, this may take you a while or no time at all. There are an assortment of dailies following the initial introduction quest line, but you can also gain rep by collecting and turning in the Netherwing Eggs. The Sha'tari Skyguard is another good rep. There are only two dailies you can do each day following the opening quests, but killing the Arrakoa around Skettis awards rep and items to call forth Terokk (this is initially a quest, Terokk's Downfall, which can be repeated with the same items). The Kurenai in Nagrand have an assortment of cool Talbuk mounts, rep with them can be obtained pretty easily by killing the ogres around Nagrand and turning in the ogre warbeads.


There are some old level 60 instances which can be fun to solo or two- or three-man. AQ20 is a favourite of mine. If you're a tank (or possibly one of the hardier dps classes, I go in bear form in my kitty gear/spec), it can be pretty easy to solo four of the six bosses. Buru the Gorger and Ayamiss the Hunter you will likely need at least two to take down (Buru will apply a hard hitting debuff, and Ayamiss has both a ranged phase and a stun), but Kurinnaxx, General Rajaxx, Moam and Ossirian you will likely be able to handle easily. The instance itself is quite interesting to see, and very different in design and atmosphere to everything in Wrath. It can also be a fun alternative to dailies, as the boss gold and item drops can be financially rewarding - all of the bosses drop books which teach abilities (ie book of Healing Touch), all of which are now taught by your class trainer, so you can easily vendor all of these (at 10g a pop!).

Zul'Gurub is another fun instance which also has a chance at two mounts (High Priest Thekal drops the Swift Zulian Tiger and Bloodlord Mandokir drops the Swift Razzashi Raptor).

Molten Core is a good one to check out as well, though this will likely require at least two people at 80. There are a few bosses which apply debuffs (magic and curses, as well as physical damage debuffs). There are also two legendaries which can be crafted from materials in Molten Core - Thunderfury, Blessed Blade of the Windseeker and Sulfuras, Hand of Ragnaros (which I'm actually working on at the moment - only need some Sulfuron Ingots and Blood of the Mountain now!).


If you're still trying to think of things to do, I suggest giving a scan of your achievements page and giving some a go! I had particular fun with the Master of Arms and Did Somebody Order a Knuckle Sandwich? achievements - I went resto, flew below Dal, and duked it out with the Treants that wander Crystalsong Forest. They toss Rejuvs on themselves when they start to lose health, so we both stood there swinging at each other and healing ourselves. Perfect for skill leveling! I happened to do these on a day when the Cooking daily was Sewer Stew, so lots of people were flying down looking for carrots, and I had some fun conversations as people came to investigate.

That's all for now - feel free to post with ideas of your own!

Saturday 17 July 2010

The heavens burn!

We were short a few people the other night, so we bonked out Ruby Sanctum (25) quickly on normal mode. I decided to record it, so here's the finished video :D The quality isn't amazing, would have liked to get it HD, but need to either figure out how to improve the quality of the in-game recorder or download a proper programme. I had a lot of fun adding the music and sounds; the music ended up syncing brilliantly, even right down to the phase changes! The track is (appropriately titled) 'A Pressing Need to Save the World' by Murray Gold.


See my discussion on healing Ruby Sanctum for more info on healing the encounter.

ETA: Sorted out how to get videos in HD, so will grab some more vids in HD quality to add soon :D

Developer Chat recap

There was a Developer Chat on Twitter the other day with some interesting responses for druids! See the full posting here at MMO Champ, druid highlights below!

Q. Will druids finally get shapeshifting on a separate global cooldown like hunter aspects & warrior stances?
A. We have no plans to remove shapeshifting from the global cooldown. Shapeshifting can be used to escape Root and Polymorph mechanics, and so cannot have no global cooldown.

Q. Is Moonfire designed to be a damage-over-time spell with an instant cast nuke, or the other way around?
A. Both. We want the instant nuke to be more meaningful in Cataclysm, especially on the move.

Q: Cat and Bear builds are only off by about 3 talent points. Why not just consolidate fully at that point?
A. This is definitely one of our concerns. We don’t want a player to be able to have an optimal DPS specialization in Cat Form and be able to tank. We will definitely engineer the Feral tree such that being a viable tank, or even off-tank, will have some cost in terms of lost DPS while in Cat Form. The druid talent trees currently in beta are very rough and need more polish. 

Q: Will Arcane spells do more damage with higher Lunar power on the scale? And will more Mastery increase that bonus damage?
A. Currently, the plan is for Mastery to increase the damage bonus of Eclipse (both Lunar and Solar).

Q. Last time I checked the Feral druid tree, there were only 5 points in the first tier which means NO choices. Is that getting fixed?
A. Still working on early Feral.

Q: Last time I checked feral druid tree, there were only 5 points in the first tier which means NO choices. Is that getting fixed?
A. Yes.

Q. What's the deal with Typhoon? Is it going back into talents or will it be a standard druid spell?
A. Typhoon is now back in the tree. Sorry about that. 

Q. Druids now get Swiftmend at level 10 for being Restoration, but it is a talent in the tree. What is the plan there?
A. This was a data error and has been corrected.

Q: Any word on that cosmetic Tree of Life Form glyph? Some players are sad to lose Tree of Life Form completely.
A. The only new glyph we are ready to announce right now is the Glyph of Divine Shield, which reduces the cast time of your Hearthstone whenever Divine Shield is active. :D 

Q. Druids were always a "jack of all trades, but master of none" and usually mocked when specializing. Will new talents change this?
A. In my own raids, I find druids of all 3 specializations that excel at their chosen specialization. So, I don’t understand your question.

Q. Why was the Feral druid's mana reduction cost removed from King of the Jungle? And what happened to two combo points on critical strikes?
A. These are data errors that will be corrected. Neither is intended to be cut. 

Q: Moonkin: What are your plans for Eclipse, and why does it infect so many of our talents? What are your plans to make Moonkin fun?
A. The model we are trying now lets Solar and Lunar Eclipse procs last for about 45 seconds, and each spell of the appropriate type that you cast moves the bar back closer to the middle again. The buff is canceled by reaching the middle. This should let Moonkin "hold" the buff for short periods of time when they need to move or get out of the fire.

Q. Skull Bash has a 1-minute cooldown. Is it supposed to be that way, or can we expect it to be lowered to the likes of Shield Bash?
A. The base cooldown is 60 seconds to keep the ability from being used by Balance and Restoration druids to layer too much crowd control. A Feral tree talent reduces the cooldown to 10 seconds, putting it in line with Kick and other similar interrupt abilities. 


A fair bit of news there, most key of which is the overall theme that our talent trees are still very much works in progress. 


An interesting note for tanks as well;
Q: Any plan to make "Crit Immunity" passive from choosing a tank tree instead of spending talents on it?
A. No, and you can blame the druids. We want a tanking specialization in Bear Form to feel different from a DPS specialization in Cat Form, otherwise it doesn’t feel fair to other classes when the Feral druid can do everything with the same talent specialization. We try to put crit immunity in talents you would normally take.


I suppose that's still not taking into account our different gear sets for tanking vs dps but yes. It would be nice (well, convenient) if we could have a viable bear/cat spec rather than having to differentiate. I would hope though that specialisation for either bear or cat would come down to more than just a few different points - at present, there are enough different talents that to really maximize your tanking or dps spec, your specs will be significantly different. If it's only a matter of 3 or so points in the new talent trees, I imagine many will feel frustrated at needing two specs to maximize their tanking and dpsing for the sake of only a few crucial points.

I'm hoping the Tree of Life cosmetic glyph does ultimately come through - I'll miss my little tree.
The Divine Shield glyph is pretty hilarious!

More to come

Wednesday 14 July 2010

NomNomNom!

Blizz has released the new beta talent trees, which are all now up on MMO Champion. They definitely trimmed them down! There's still a ways to go, particularly for druids, but the new talent trees are interesting to look at all the same and they give an interesting view of what's ahead.

Take a look! MMO's Cata Druid Page and their Cataclysm Talent Calculator. Do keep in mind that this is all subject to change!

I've had some pokes at the talent trees and they look interesting. I'm particularly liking the new talents down the Resto and Feral trees. Efflorescence looks fun and useful (I don't see many raiders being aware enough to move into your flower patches, but this will be wonderful on groups that are stacked together, namely melee and grouped ranged). The NomNomNom talent (which I'd be quite happy for it to keep that name) in feral will be brilliant towards the ends of fights, seeing as I already have some conundrums during the final moments of fights over whether I should refresh my Rip or if it would be more effective at that point to just Ferocious Bite til dead.

The last time I did a full-fledged spec and analysis of the Cata trees (on my guild's forums), Blizz announced just a few days later that they were trashing them and doing these new ones! So I won't rush into this one just yet. I'd also like to give MMO a little bit more time to work out any kinks or errors that may still be up (it was a hectic night for them, I'm sure). But the links above are definitely very interesting, so do check them out! I will post some more reaction to them and Cata changes soon.


I also wanted to make a note for my Feral followers - I will be posting more on Feral soon! I'm working on a guide similar to my How to be a Tree! guide for Cats, and I'll follow that up as soon as I can with one for Bears. Those posts are much more involved, so they take a bit longer to fully write and organize, but I will get them up as soon as I can!

Tuesday 13 July 2010

Beware the shadow! Healing Ruby Sanctum

Ruby Sanctum dropped in the past few weeks and with it, a new fuschia dragon has emerged to threaten the heroes of Azeroth! Enter Halion.
For the past few weeks my guild has been working on this fight on HardMode in 10- and 25-man. It’s been a nice break from ICC and a lot of fun learning a new fight.
I won’t go over all of the mechanics of the encounter - information on the encounter itself is better found at a place like Tank Spot. Let’s take a look at what you can expect from a healing perspective though.

It will likely help your raid to designate dispellers for the Soul Consumption debuff in the Twilight Realm and the Combustion debuff in the Physical Realm. It can be removed by magic dispellers and decursers. I don’t recommend assigning your full-time tank healers to this duty (ie your Holy Pally) as they will likely be unable to spare the GCD. Placement and handling of the debuffs and dispells will come down to your raid’s strategy.
Phase 1:
The incoming damage in Phase 1 isn’t too bad. On normal mode in particular, unless your raid members don’t move out of fire, the only real damage will be on the main tank and it’s very manageable. Don't go to sleep, but don't spam yourself oom either!
In hard mode 25-man, each Meteor Strike will also summon adds which, depending on your raid’s strategy, will be handled by your Main Tank and Off Tank, so you should be expecting additional damage from the adds. It’s also reasonable to expect some of your melee to end up tanking some of the little adds from cleave aggro - so long as the primary big add (the Living Ember) is kept far enough away from the little adds so as not to buff them, the cleave aggro damage is easily manageable and will likely be handled by your HoTs.
Phase 2:
This is where the fight gets trickier, right from transition. Make sure your Twilight Realm tank gets through the portal first to pick up Halion, but be sure you aren’t far behind! The transition to phase 2 comes when Halion reaches 75%, so I keep an eye out for that and begin HoTing our Twilight Realm tank up in preparation for the transition. 
On hardmode especially, Halion hits the tank hard, and coupled with the shadow tick damage in the Twilight Realm, the tank will be taking a lot of damage. 
Because of phasing issues, lag, etc on transition, we’ve found it best to prep the tank and pop a cooldown on him before he goes through the portal (usually a Guardian Spirit or Pain Suppression from one of our priests). This is why I find HoTing the tank before going through the portal so important - because of the phasing issues there’s a risk of the tank taking damage but being unable to heal him for a second or two. With full HoTs up (plus other healer’s HoTs and cooldowns), I know there’s a little bit of leeway as the tank will still be receiving heals. I also know that I’ll be able to use Swiftmend on the tank the second they’re healable. Some Lifebloom stacks pre-transition are nice as well, as, if timed right, they’ll bloom while you’re porting down and top up the tank.
Once everyone phases in and gets into their positions, healing becomes more stable, though there’ll still be a lot to heal. Druid HoTs really shine in the Twilight Realm. The constant ticking damage is perfect for our HoTs, and your Rejuvs and Wild Growths will be great for topping up the raid. Because of all the movement in the Twilight Realm avoiding the cutters (which there’ll be two of in hardmode by the way!), all the instant HoTs will be even more helpful.
The ticking aura damage will likely end up the least of your worries in the Twilight Realm. Apart from avoiding the cutters (which will simply one-shot anyone who gets hit by them), you have the Soul Consumption debuff to worry about and the tank damage. 
The Soul Consumption in the shadow realm sucks people into the void zone and it also slows the movement speed of anyone caught in it. I try to HoT up (at least a Regrowth and Rejuv) whomever gets the debuff in the Twilight Realm to aid in their healing and to try to counteract the additional damage they take while moving out of the void zone. Any movement boosts can be very helpful when escaping the Consumption void zone. Kitty dash is good, I personally prefer to use my rocket boots as I can continue topping myself up as I run (though this luxury is only afforded to engineers). I also pop Barkskin when caught in a void zone to reduce the incoming damage. If you have a Holy Priest in the raid, speccing into Body&Soul may also be helpful for your raid - tossing a bubble on a debuff target may help them move out of the rest of the raid faster and hopefully escape the void zone more quickly as well.
The tank damage will also be heavy in the Twilight Realm, especially on hard mode. The tank will be taking the usual hits from Halion - melee, cleaves and breaths - but will also be taking ticks from the aura damage. The entire raid will also be forced to move to avoid cutters which will affect healing as well. I try to save my Swiftmend for cutters so that the instant big heal is available for either the tank or a raid member affected by Consumption. In hardmode especially as well, it was very helpful to rotate cooldowns on the tank during cutter movement to help ease the damage during a more difficult healing period.
As a druid, you likely won’t have too much trouble dealing with the ticking aura damage - your HoTs will do a good job topping the raid off, and it will be easy to keep throwing HoTs onto raid members even during cutter movement. What will be more difficult is balancing your raid heals with your heals on the tank and Consumption targets to ensure you don’t fall behind on the raid. Keeping an eye on Cutter timers and planning your movement during cutters will help you here. 
On normal mode you’ll have an easier time, with just a single cutter you’ll be able to find a spot and have minimal movement as the raid and dragon shift with the beam. The additional cutter on hardmode makes a much smaller quadrant to stand in, though. I find that cheating towards the leading cutter can give you time for a full cast or two before you need to move again. Still, that’s still not a lot of time or casts! It’s really crucial that you’re preparing for each cutter. HoTs on the tank, having swiftmend available, strategic use of Lifebloom ticks and blooms, and planning your movement will help tremendously.
Phase 3:
The third phase is essentially Phase 1 and 2 at the same time. The abilities will all be the same, just half of your raid will be going up to fight Halion in the physical realm while the other half will remain in the Twilight Realm. DPS needs to keep a careful eye on Halion’s corporeality (noted in the Blizz UI at the top of the screen - Halion’s Corporeality is at x%) - you want this percentage to remain as close to 50% as possible. If DPS gets too high in one realm, it will cause Halion to deal more damage in the other realm. 
As a druid, you will likely be asked to remain in the Twilight Realm to help deal with the aura damage. Covering the raid at this point will likely feel easier as there will be fewer people down there needing heals. This will be helpful as you continue to deal with cutters and keeping the tank and Consumption targets healed up.
A note on Battle Rezzes:
When someone dies in this encounter, their corpse appears in the physical realm. So, if someone dies (to cutters, for example) while in the Twilight Realm, their corpse will disappear from the Twilight Realm and you’ll suddenly find them out of range. This can make it tricky to do battle rezzes, particularly if you are assigned to stay in the Twilight Realm.
This can be handled many ways. One is for you to take a portal up to go get them - this is the least desirable solution in my opinion. Depending on your current position, it may take time for you to get to a portal. You risk phasing into the Physical Realm into fire or find yourself at the wrong end of the dragon. When porting back down you face the same potential problems and, if you’re not careful about watching the cutter timers, you may even port yourself right into a cutter. All this while, the raiders in the Twilight Realm won’t be receiving your HoTs. 
If your raid has several resto druids, your raid leader may decide to send one of you into the Physical Realm in phase 3 while the other stays in the Twilight Realm, though depending on your raid makeup they may want you both to remain in the Twilight Realm.
Another solution is to have DPS druids in your raid go to the Physical Realm to ensure Battle Rezzes are available if needed.
The optimal solution would of course be for no one to die!
A last note on one ability of Halion’s that bears mentioning:
Twilight Precision: Halion’s insight into movement between phases allows him to deal unexpected strikes, increasing his chance to hit by 5% and reducing the enemy’s chance to dodge his attacks by 20%.
This is basically the Ruby Sanctum’s ‘Chill of the Throne’ (but no Strength of Wrynn buff in here!). Expect big hits on your tank!
That’s all for now! Feel free to post with any questions, comments, or any tips you’ve picked up for this fight!


Edit: Check out this post for one of my videos of Ruby Sanctum.

Warning: New scam with Celestial Steeds

I love my shiny sparkle pony, and I imagine many players would still love to get one, especially if it's free. Unfortunately, though, it looks like hackers are upping their attempts to break into your account with a new scam that makes it look like you've been given a Celestial Steed. The good people over at WoW.com posted this story, including a copy of what the scam email looks like and some very helpful tips for protecting your account and what to do if you're hacked. Read the full story here: New scam tries to give you a free Celestial Steed.

The sample of the scam email they posted looks very convincing, so be very careful with any emails you receive! With the latest round of beta invites reported to be going out this week, also be very careful with any emails mentioning an invite - your battle.net account will be flagged for a beta trial, possibly before you even get an email, so don't follow any links out of an email! Always type the official WorldofWarcraft or Battlenet url into your browser to ensure you get to the official site and not a keylogger.

I also recommend picking up an Authenticator for your account. It's very cheap and will help keep your account protected! Remember to never share your account information with anyone, and Blizzard employees and GMs will never ask for your account information or password. Plus, you can get a cute core hound pup with your authenticator!

Keep safe!

Monday 12 July 2010

Some love for Engineers

MMO-Champ had a post today with good news for Engineers! Looks like Blizz will be giving us some serious love in Cataclysm with bonuses similar to the Jewelcrafting Dragon's Eye gems.

It looks like we'll have bonus items called Cogwheels and Hydraulic Pumps which give +132 to certain stats. This will certainly be a nice boost for Engineering, which currently is regarded as more of a 'fun' profession rather than a useful one (though I still find my Rocket Boots to be invaluable in certain fights!). The mana-injecting belt should be useful as well; I already love my Runic Mana Injectors, and with mana conservation becoming more important in Cataclysm I'm sure the belt enchant will be a great help.

The Cogwheel/Hydraulic Pump bonuses are as follows:
-Fractured Cogwheel: +132 Mastery Rating
-Quick Cogwheel: +132 Haste Rating
-Smooth Cogwheel: +132 Critical Strike Rating
-Subtle Cogwheel: +132 Dodge Rating
-Flashing Hydraulic Pump: +132 Parry Rating
-Precise Hydraulic Pump: +132 Expertise Rating
-Rigid Hydraulic Pump: +132 Hit Rating
-Sparkling Hydraulic Pump: +132 Spirit

Intriguing!

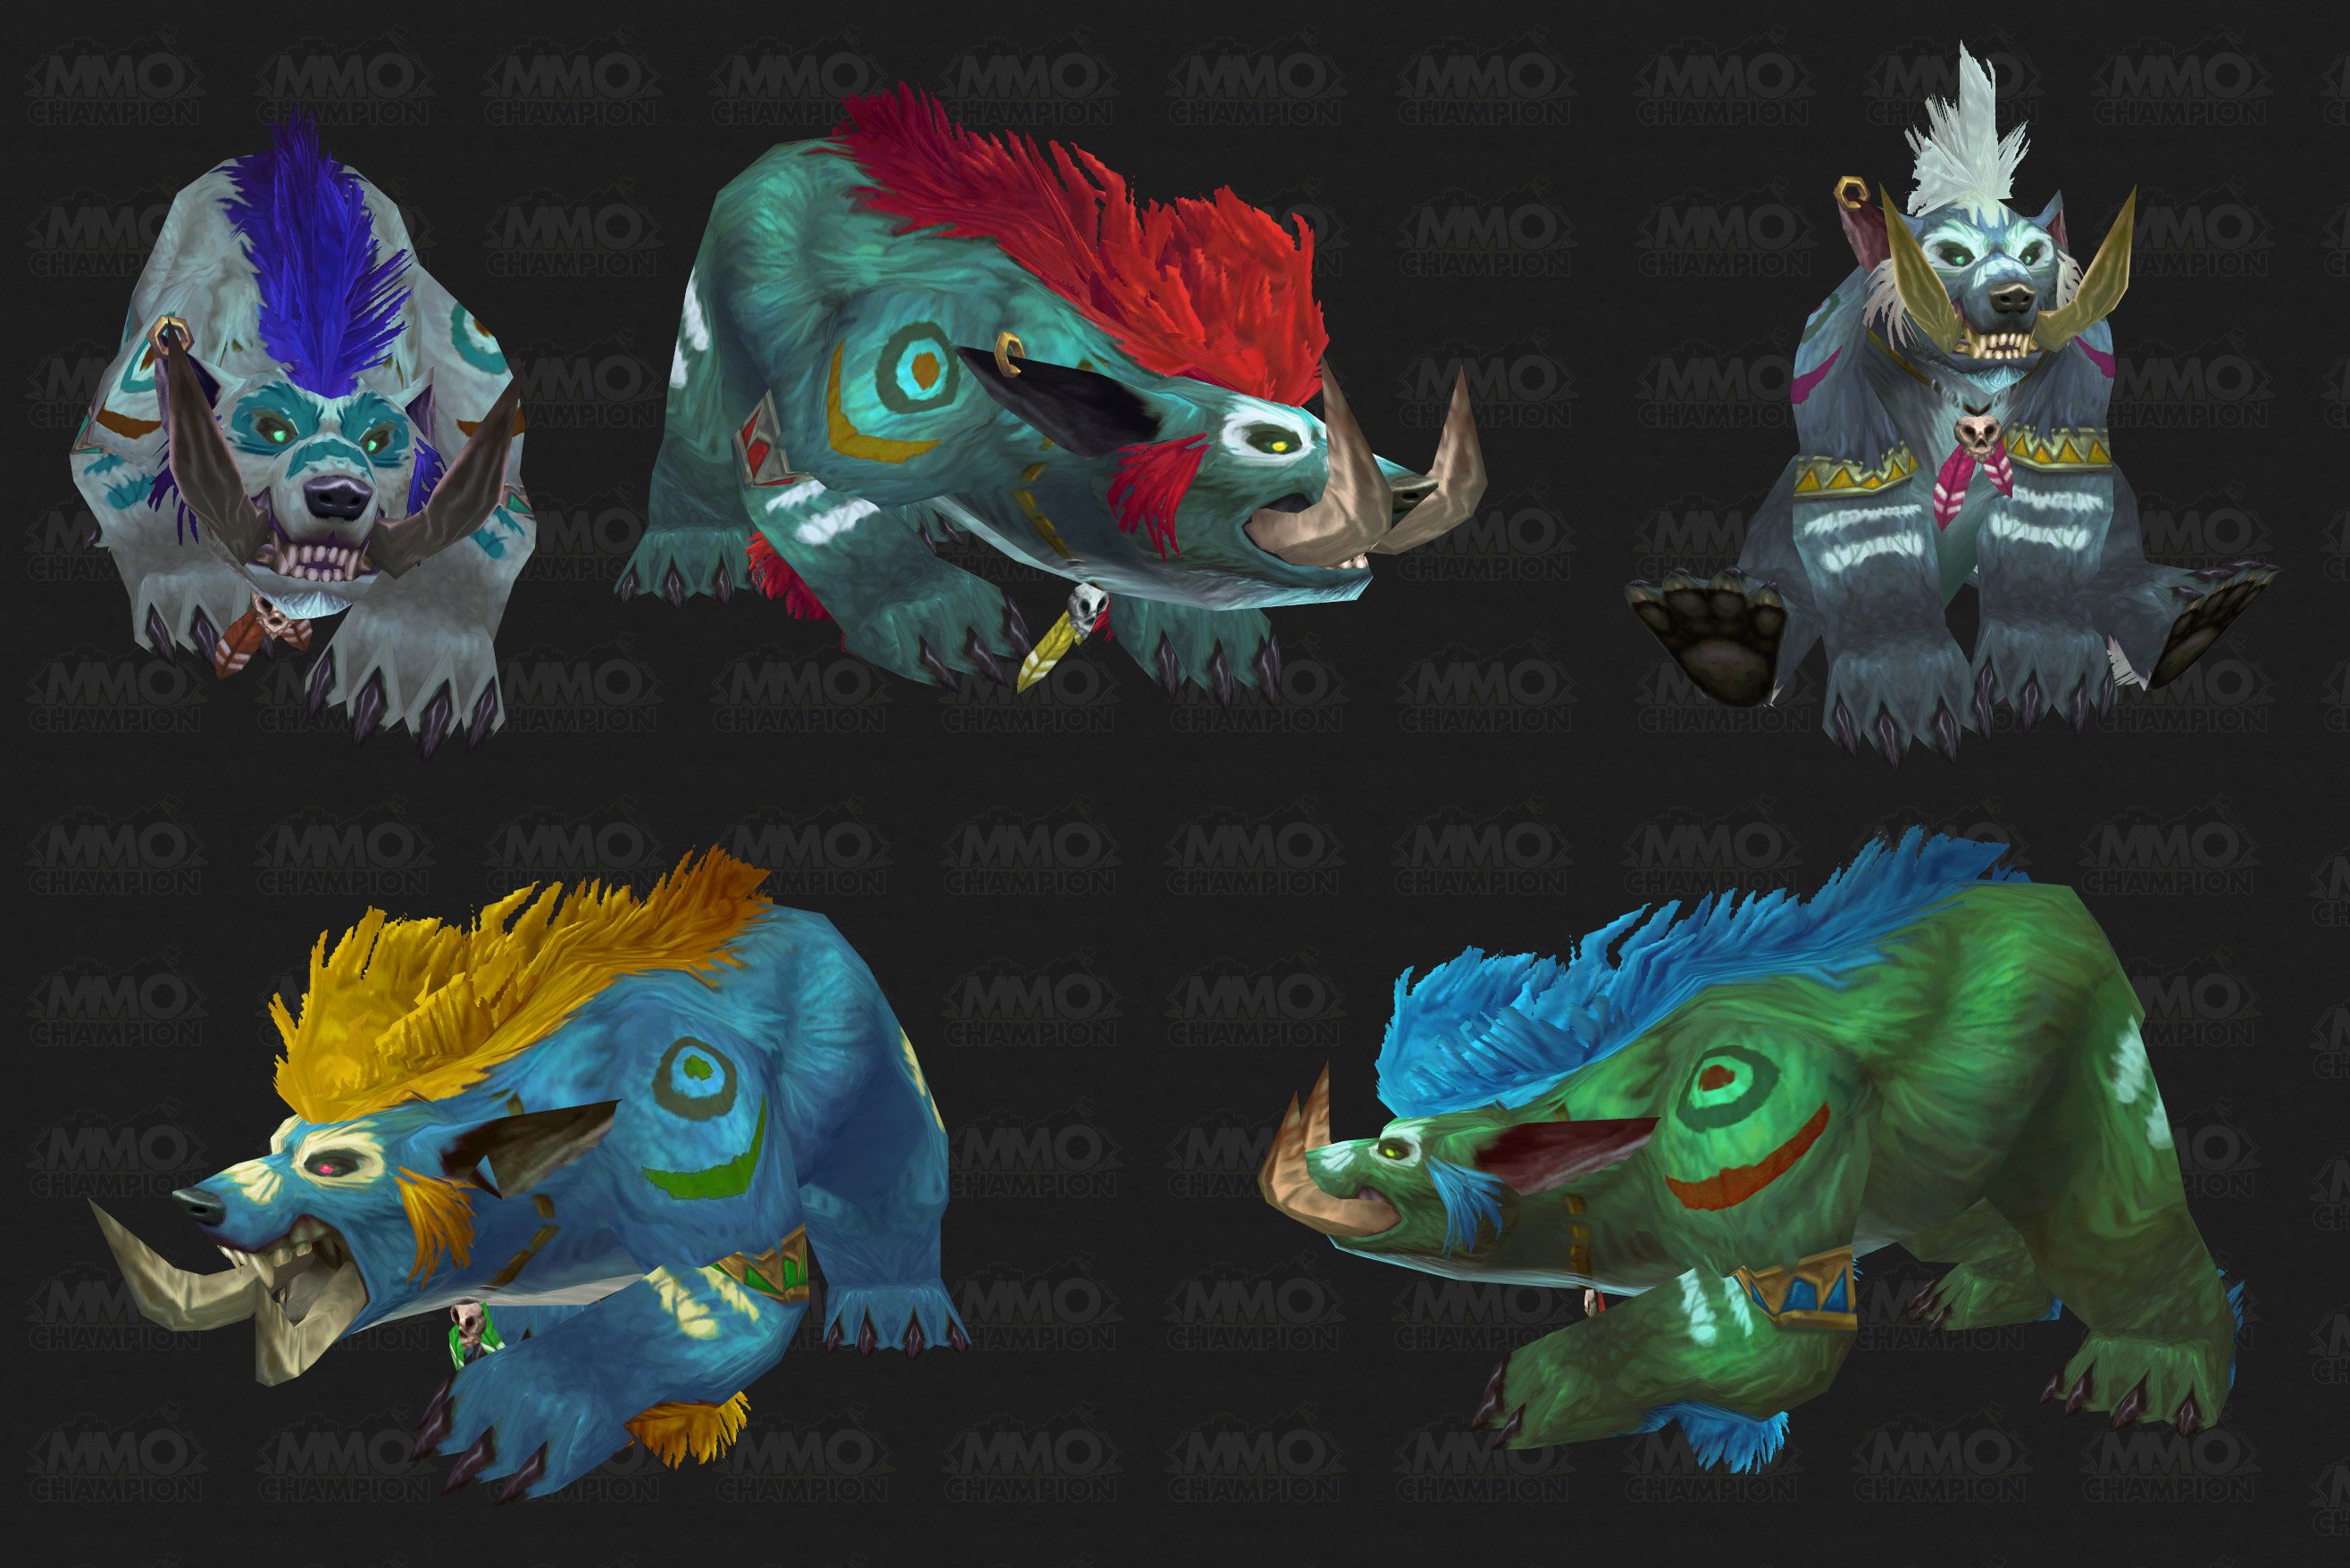
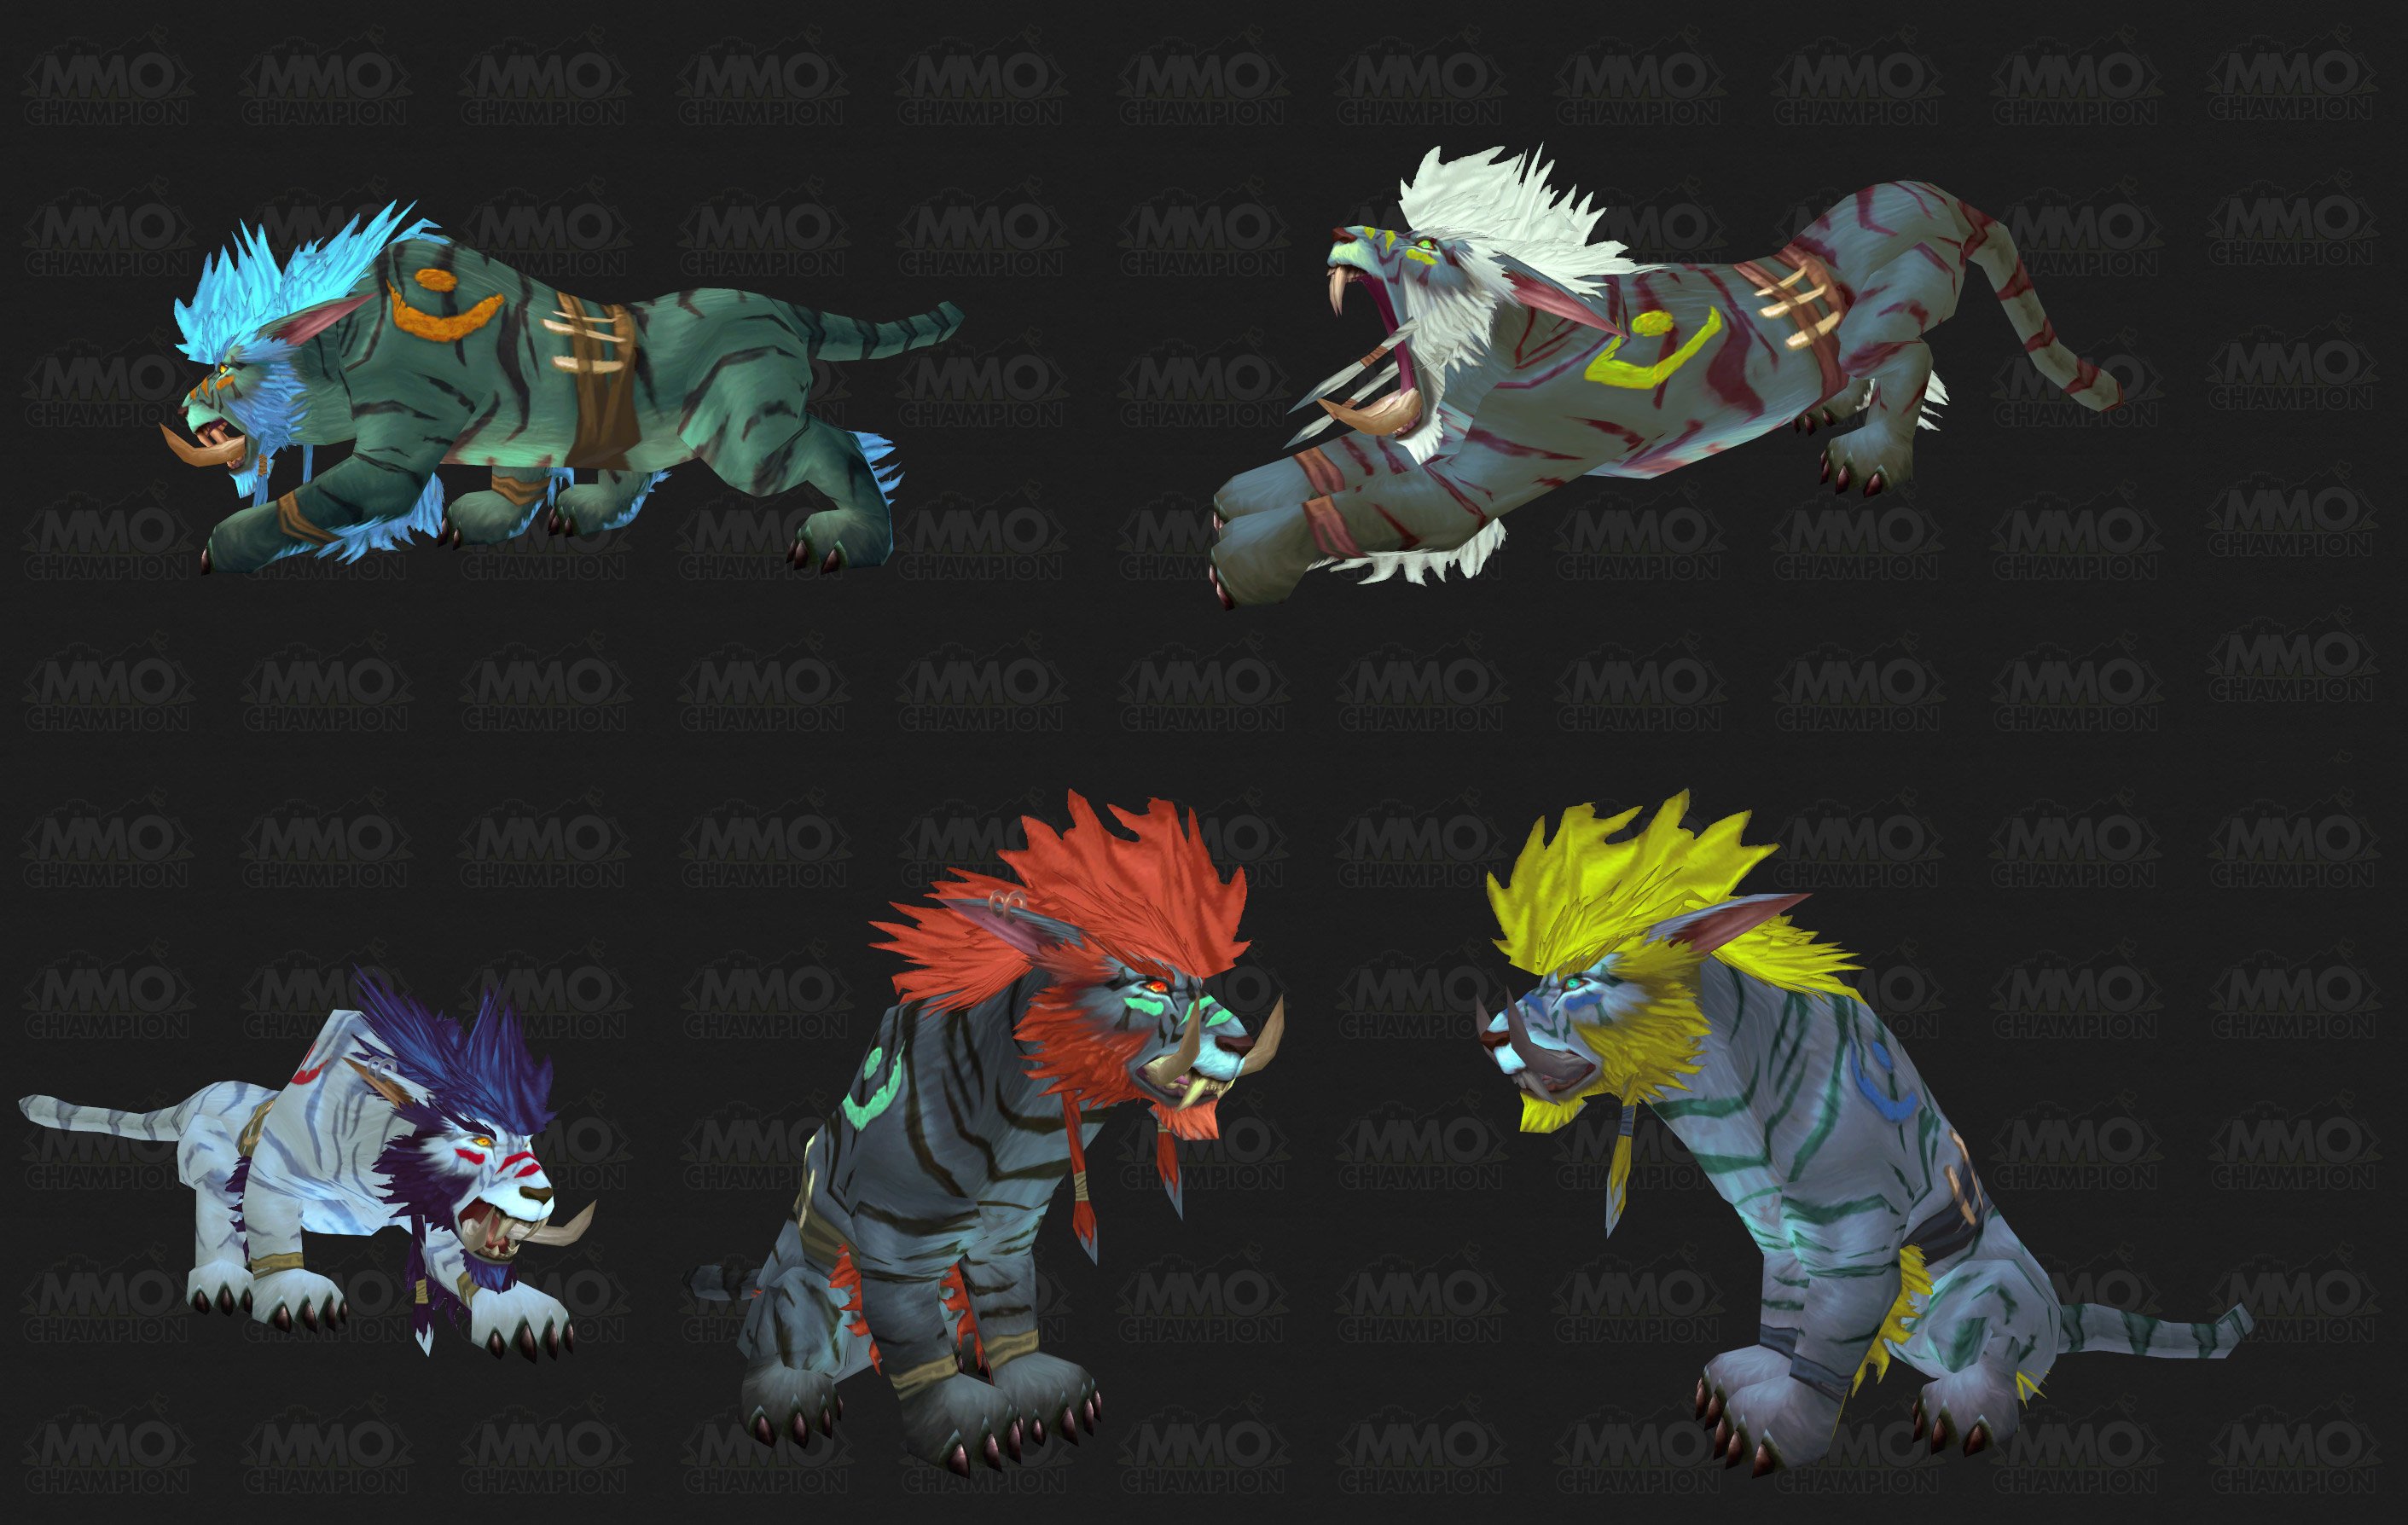
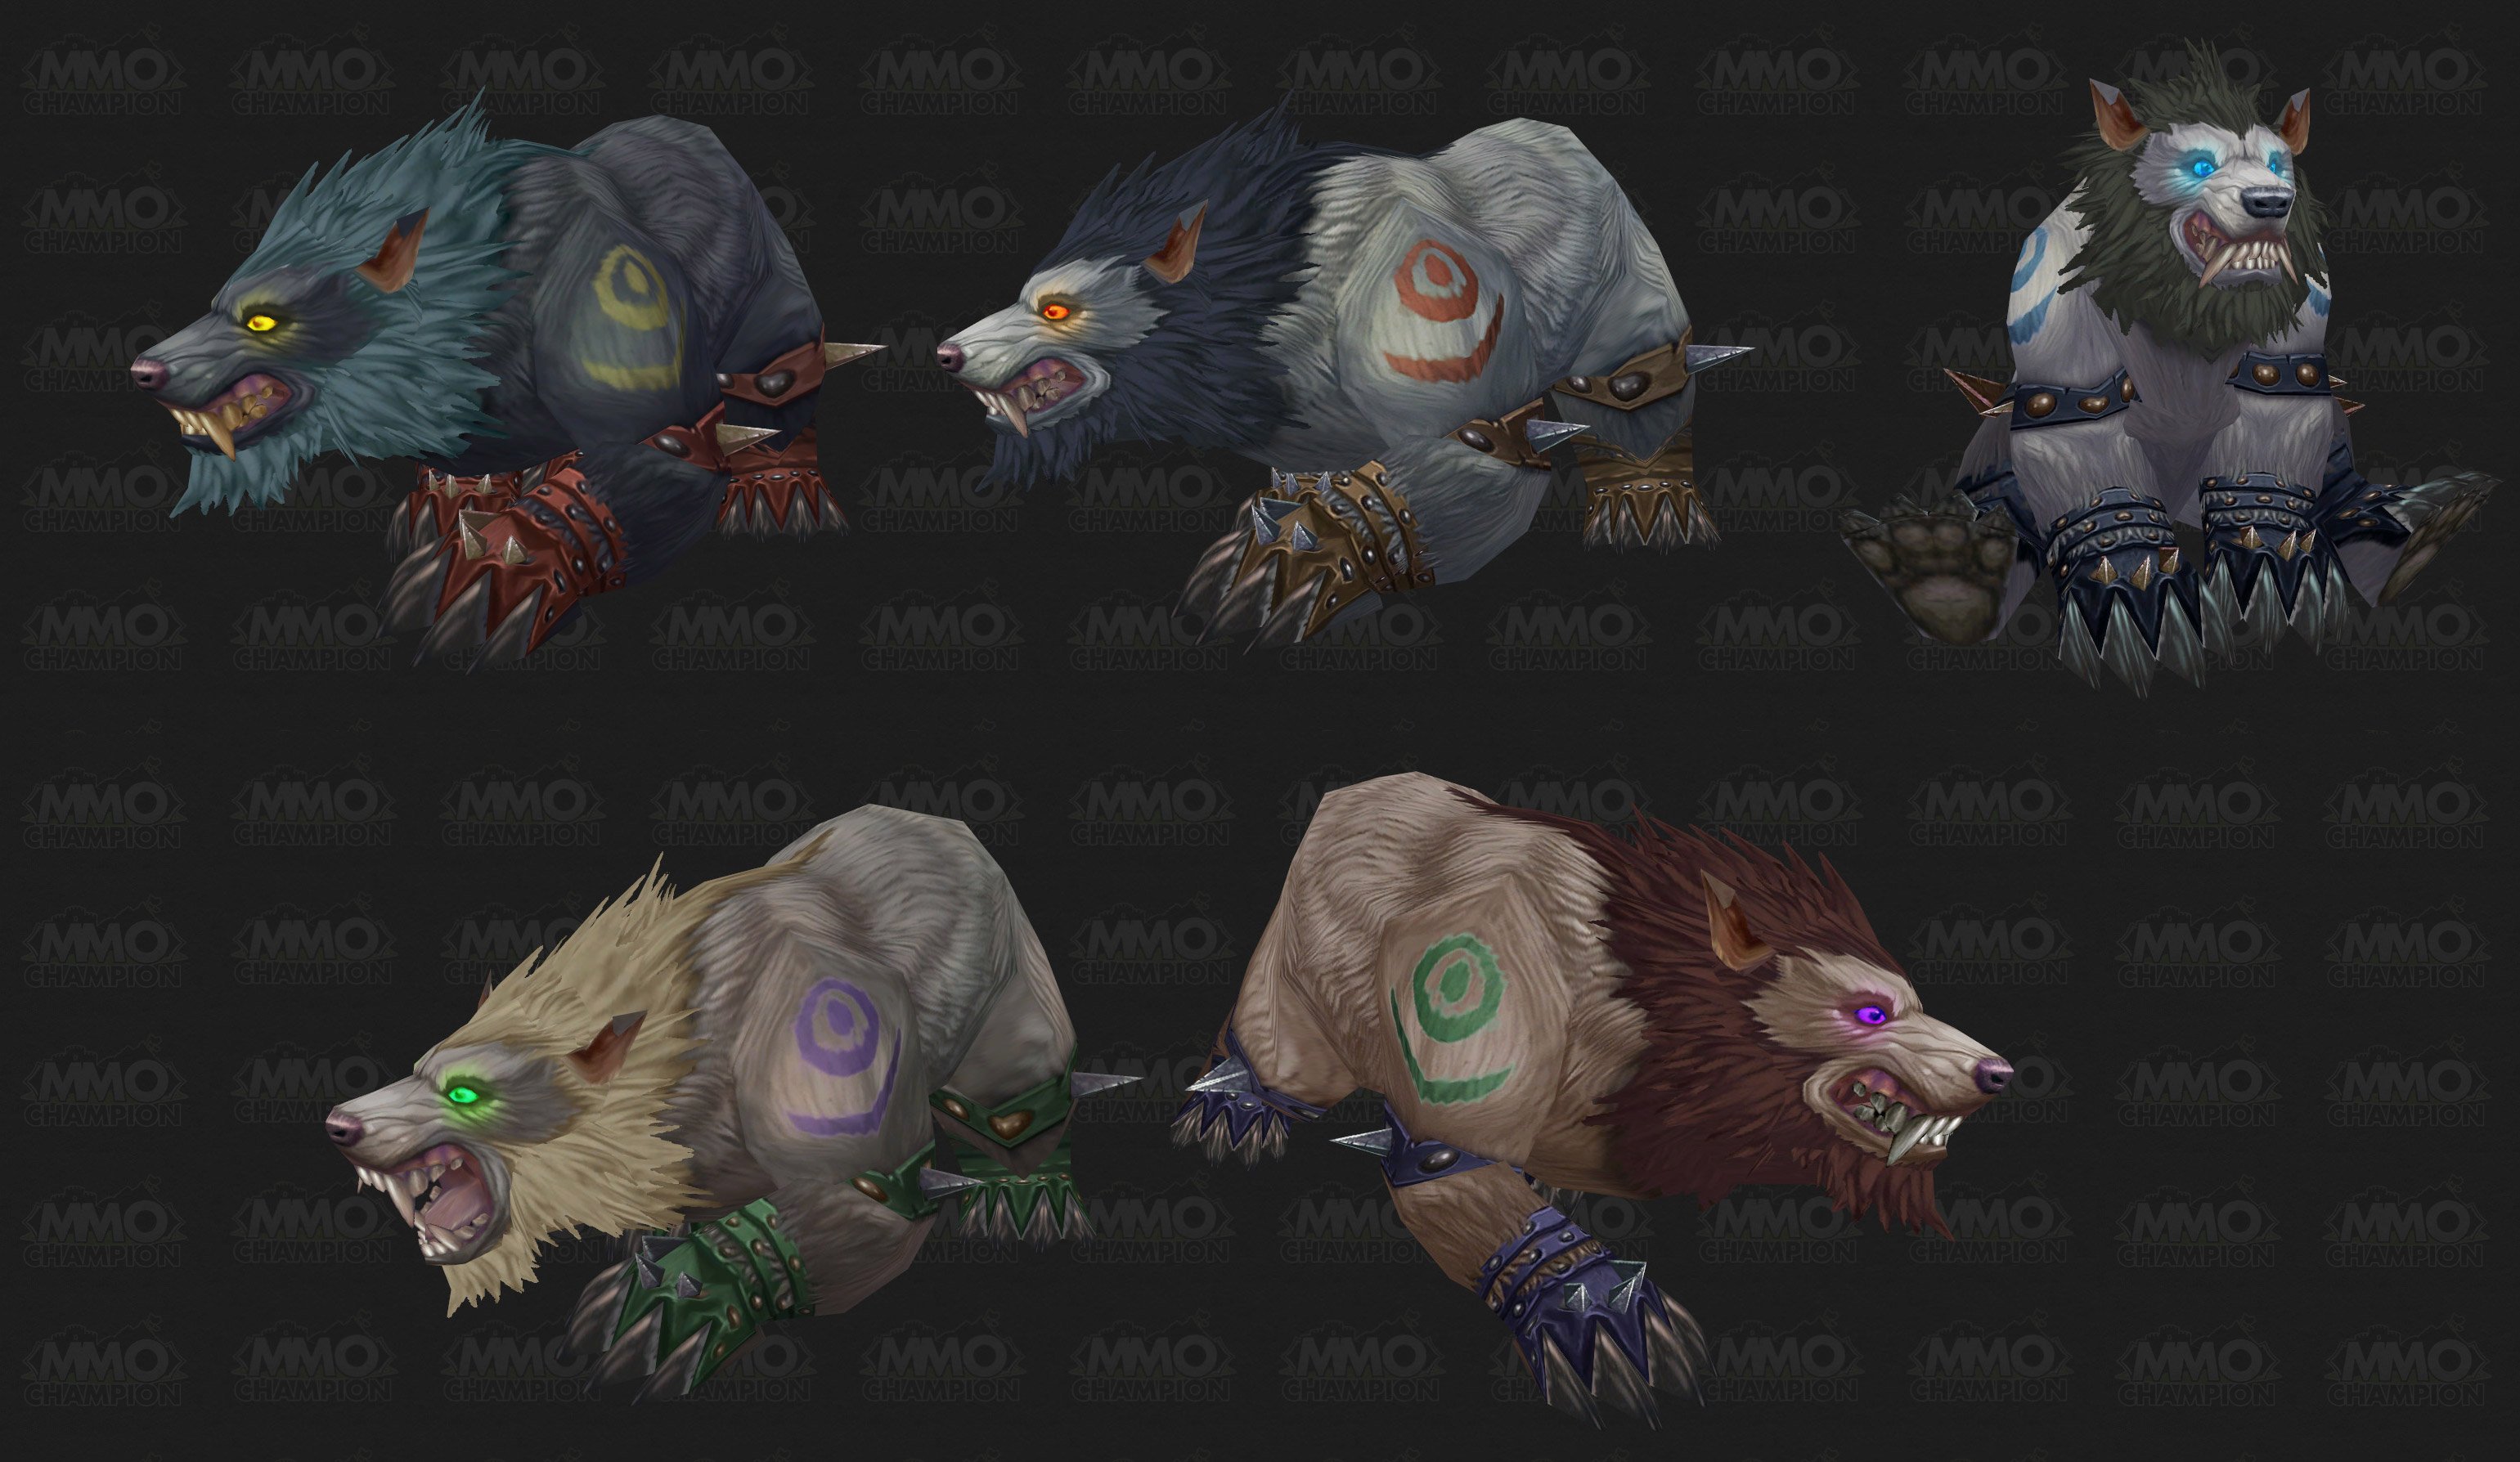
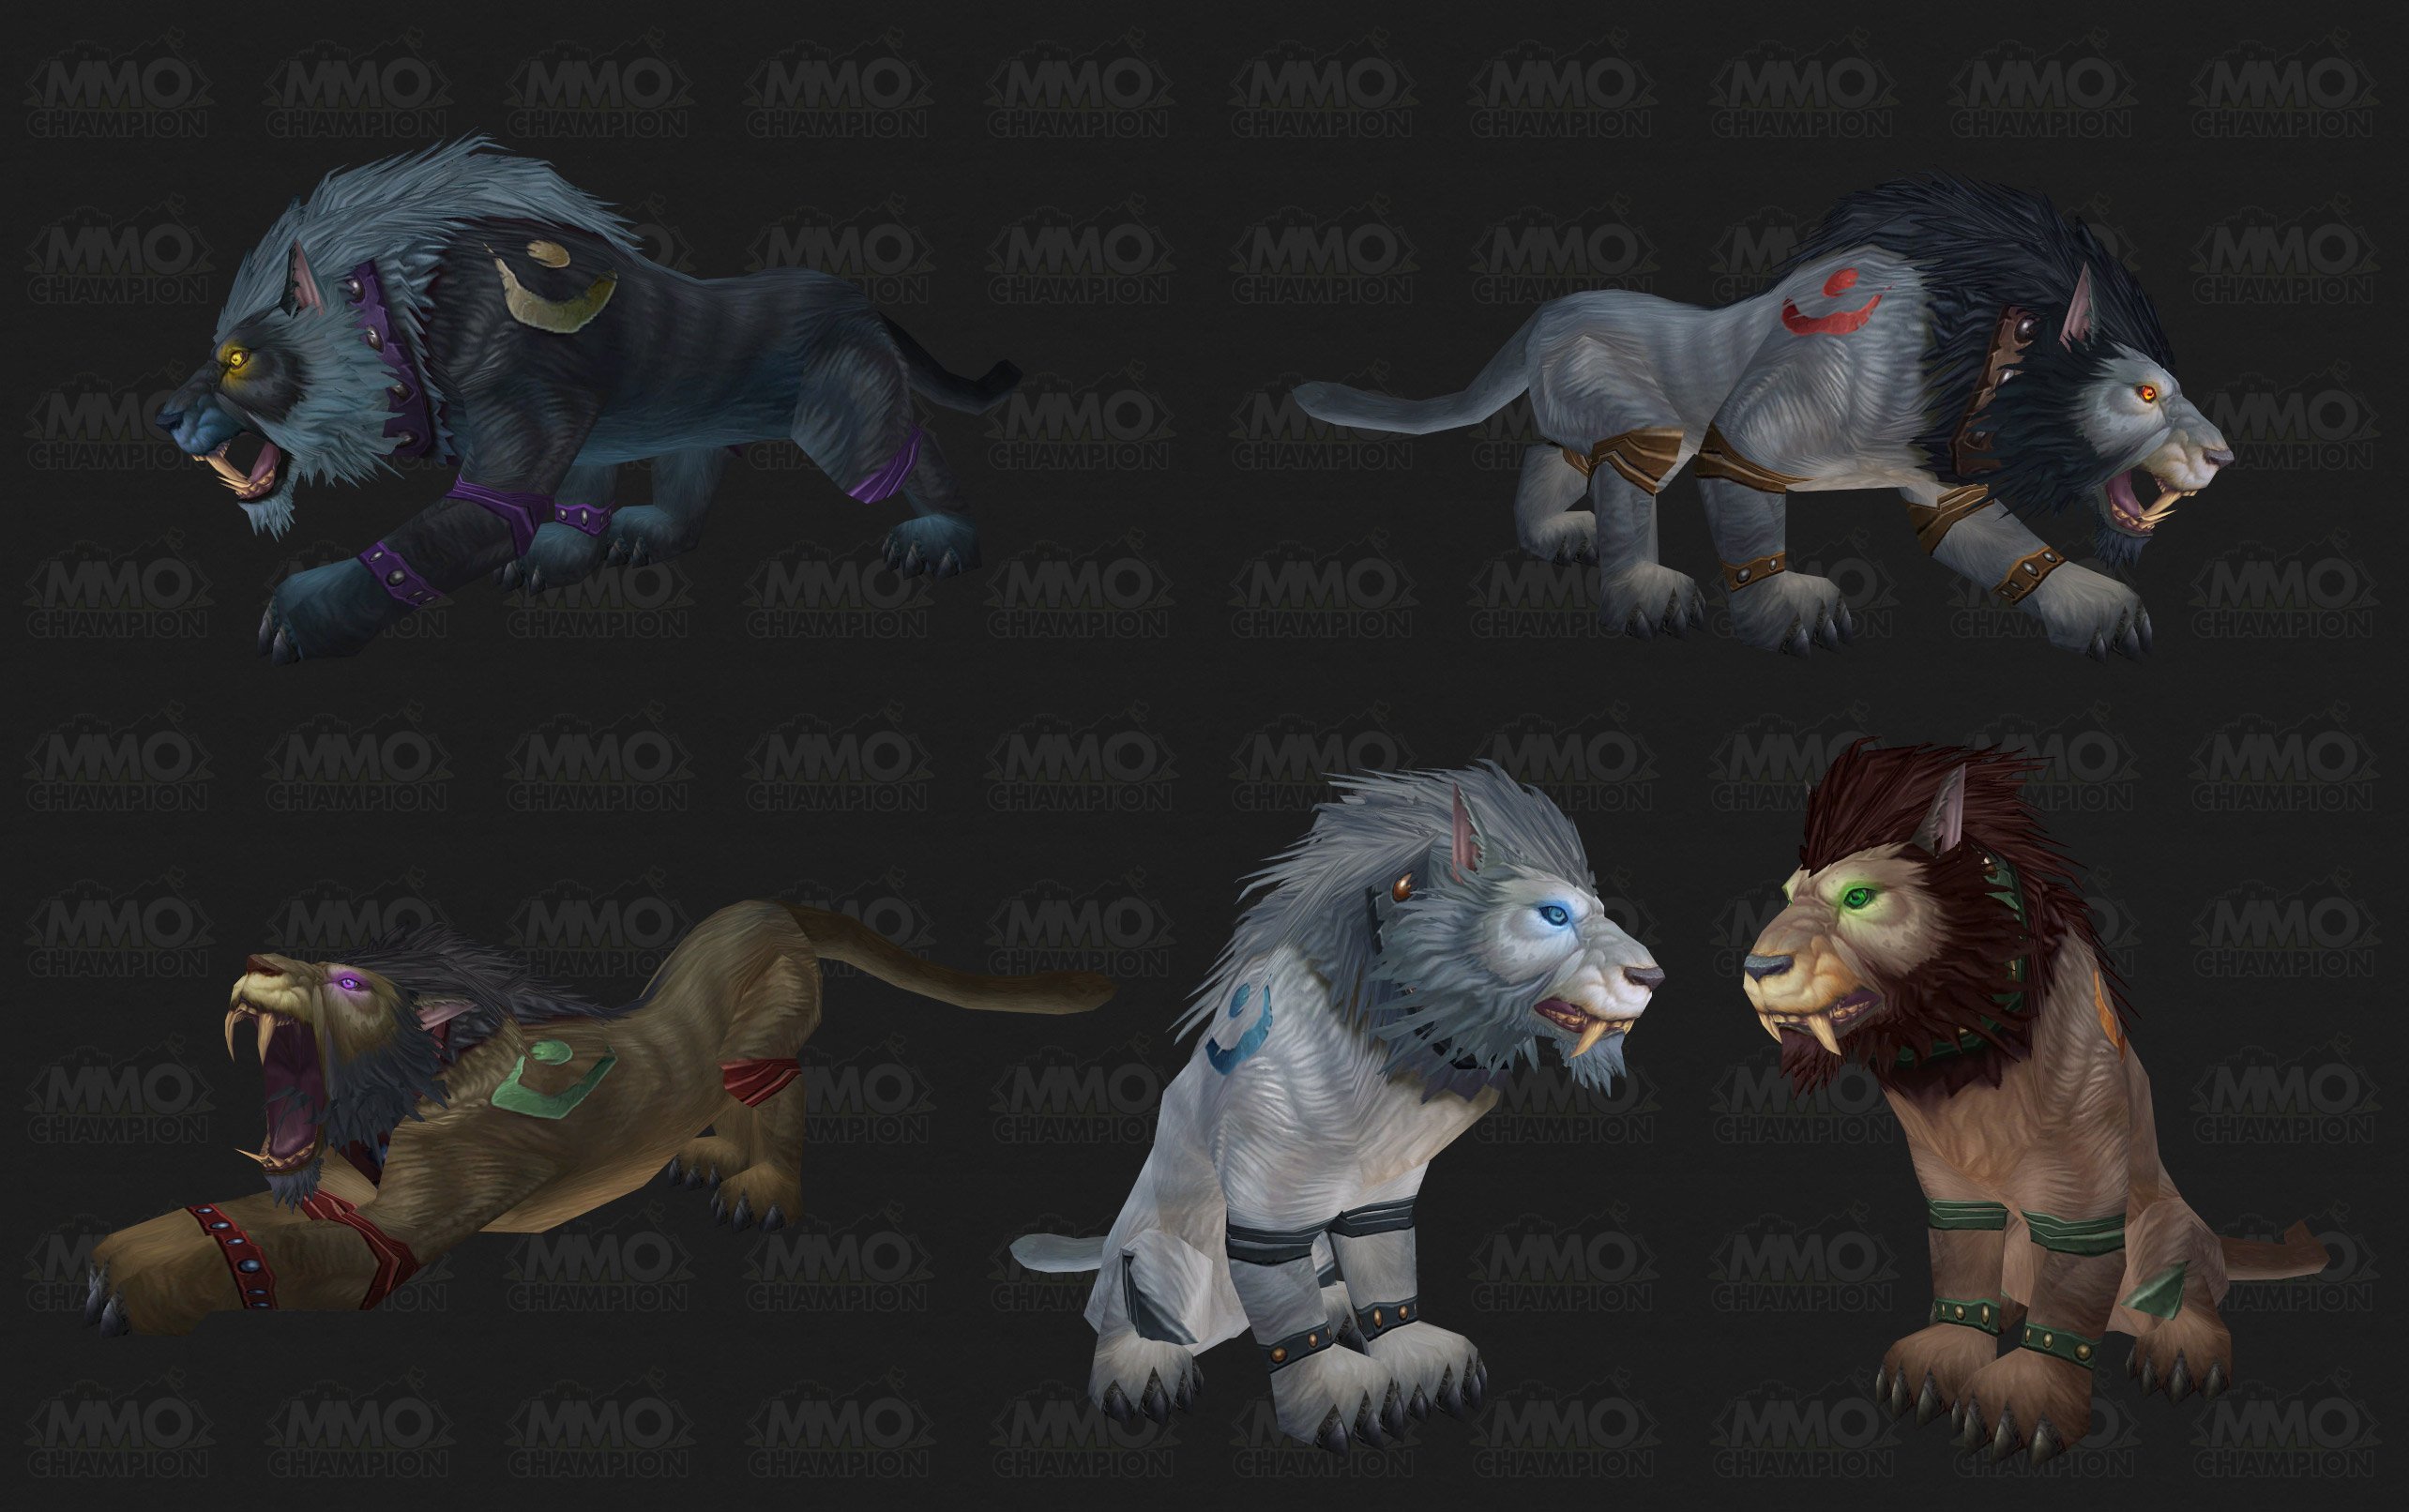
Troll and Worgen Druid Forms

The Cataclysm NDA was lifted and with it, a first look at the Troll and Worgen Druid forms!

Troll Bear form:

Troll Cat form:

Worgen Bear form:

Worgen Cat form:


I quite like the Worgen forms, they look cool and quite fierce, particularly the armour and spikes on the bear form. I think I may race change my second druid to a Worgen actually.  My main shall remain a Night Elf though!

I'm a bit mixed on the Troll forms. Mainly the colours seem a bit extreme, at least in the Bear forms. A sky blue and yellow bear looks a bit odd! Perhaps it will look a bit better in-game, though. The Troll cat forms are a bit cooler, I particularly like the tiger stripes they get.

All in all, some cool forms!

How to be a Tree! Part One: Specs and Glyphs

I thought I’d kick off the blog with a guide to being a tree.
The first three important things you MUST know how to do as a tree:
/cheer
/dance
and, of course, how to jump.
Now that you’ve got those down, on to the rest!


All of the following is applicable as of patch 3.3.5.
I’ve decided to break up this guide into three sections:
Let’s start with Specs and Glyphs:
My current spec is a 14/0/57 build, which you can see here:

Broken down point by point:
Restoration tree:
Imp. Mark of the Wild 2/2: Increases all attributes by 2% as well as improving Mark/Gift of the Wild buff. 
Nature’s Focus 3/3: Reduces pushback caused by damaging spells while casting Regrowth and Nourish. 
Natural Shapeshifter 3/3: Reduces the mana cost of all shapeshifting.
Subtlety 2/3: Reduces threat caused by Restoration spells, gets you to the third tier.
Master Shapeshifter 2/2: Increases effect of shapeshift form; in ToL increases healing by 4%.
Omen of Clarity 1/1: Each of the druid’s healing, damage spells, and auto-attacks have a chance to cause the druid to enter a clearcasting state. Clearcasting reduces the mana/rage/energy cost of the next ability by 100%. A must in all specs.
Intensity 3/3: Allows mana regen to continue while casting; leads to Nature’s Swiftness.
Tranquil Spirit 1/5: Reduces mana cost of Nourish, Healing Touch and Tranquility.
Improved Rejuvenation 3/3: Increases the effect of Rejuvenation by 15%.
Nature’s Swiftness 1/1: When used, your next nature spell under 10s becomes an instant cast. 
Gift of Nature 5/5: Increases all healing by 10%.
Empowered Touch 2/2: Increases the bonus healing effects on Nourish and Healing Touch. 
Nature’s Bounty 5/5: Increases the critical effect chance of Regrowth and Nourish.
Living Spirit 3/3: Increases your total spirit by 15%.
Swiftmend 1/1: Consumes a Rejuv or Regrowth to instantly heal the target (combine with Glyph of Swiftmend in order to not consume your or other druid’s HoTs - Swiftmend CAN be used on targets affected by another druid’s HoTs).
Empowered Rejuvenation 5/5: Increases the bonus healing effect of your HoTs.
Living Seed 2/3: Nourish, Regrowth and Swiftmend criticals apply a living seed to the target which heals the target when they next take damage.
Revitalise 3/3: Rejuvenations and Wild Growths have a chance to restore Mana, Rage, Runic Power, or Energy to a target.
Tree of Life 1/1: Shapeshift into the Tree of Life.
Improved Tree of Life 3/3: Improves ToL, increases your spellpower by 15% of your spirit.
Gift of the Earthmother 5/5: Increases total spell haste by 10% and reduces the global cooldown of Lifebloom.
Wild Growth 1/1: Heals up to 5 (6 if glyphed) targets over 6 seconds.

Balance tree:
Genesis 5/5: Increases the healing of your HoT spells.
Moonglow 3/3: Reduces the mana cost of Nourish, Regrowth, Rejuvenation, Healing Touch by 9%.
Nature’s Majesty 2/2: Increases the critical effect chance of Nourish and Healing Touch.
Nature’s Grace 3/3: Non-periodic spell criticals increase spell casting speed by 20% for 3 seconds.
Nature’s Splendor 1/1: Increases the duration of your rejuvenation and regrowth spells.

Most of the points in this spec are pretty self-explanatory in terms of boosting healing and heal-over-time (HoTs) spells. I’ll touch on some of the talents as we move up each tier and also explain some of my talent choices which aren’t picked up by all trees.
Tranquil Spirit 1/5: I’ve only placed one point into this talent for several reasons. At higher gear levels and with the amount of replenishment available in 25 man raids, mana is less of an issue, so I’ve found it to be unnecessary to place any more points in there. I have considered removing that last point and putting it elsewhere (possibly to top up Living Seed to 3/3), however, that little bit of mana cost reduction is nice to have. 
My primary mana cost reduction points are over in the Balance tree, in Moonglow. I find Moonglow to be a much better talent to spend points for that purpose. Firstly, for only 3 points, it reduces the mana cost by 9% (3 points in TS will only get you 6% reduction). Moonglow also reduces the mana cost of Regrowth and Rejuvenation as well as Nourish and Healing Touch, Tranquil Spirit does not. The points in Moonglow are also required to get to the next tier in the Balance tree, whereas you can move on in the Restoration tree without Tranquil Spirit, so it’s points better spent elsewhere.
Improved Tranquility 0/2: I find myself rarely using tranquility in raids, mainly due to the fact that it currently only effects the druid’s party rather than the raid. I’ve read they may be changing Tranquility in Cataclysm to act a bit more like a priest’s Divine Hymn, so that it’s effect will be over the raid instead of the party, which will make the spell much more valuable.
Empowered Touch 2/2: I have seen druids not pick up this talent, for various reasons. One common reason arises out of the need for spare points, most often to pick up 18 points in Balance (I will touch on this spec variation shortly); another is some druids find it unnecessary as they tend to use only Rejuvenation and Wild Growth. I consider Empowered Touch to be an important talent, primarily as Nourish is an excellent spell and this talent boosts its heals even more. For more on the value and use of Nourish see the Spells and Strategies post.
Living Spirit and Improved Tree of Life: I mention this only as I have seen druids either skip the Living Spirit talent or, alternately, pick it up but then avoid gear or gems with spirit in favour of mp5 pieces. With Imp. Tree of Life, spirit increases a druid’s spellpower in Tree form as well as feeds into our mana regen, so spirit is nice to have on gear or on gems. (More in the Gear, Gems and Enchants post).
Living Seed 2/3: Another talent often skipped by druids, mostly by those again going for an 18/0/53 spec. This tends to be considered more of a tank-healing spec talent as well, and so is often skipped by those who consider themselves to be solely raid healers and nothing more. Although Living Seed will never make up the top percentage of your heals, it does still contribute to healing and every little bit helps. Often in raids as well, even if tasked with healing the raid, an eye is always on the tanks and I’m always putting my hots on the tanks and swiftmending them. The Living Seeds placed on the tanks will help, and again, every little helps, so I find this to be a good talent to pick up, whether maxxed 3/3 or not.
Revitalise 3/3: I’ve had some mixed feelings about this talent in the past, though I’ve grown more fond of it recently. The mana and rage return doesn’t seem too fantastic, but the runic power and energy return is really quite valuable. I’ve even seen Druids fill up a Death Knight’s runic power through HoTs pre-pull. Those little bits of resource return can add up in fights, particularly in straight dps races like Festergut and, certainly for the DKs and Rogues in melee, for Saurfang.
Gift of the Earthmother 5/5: I’ve seen druids miss this talent, but it’s an important one, particularly with all the haste we need at the moment.
In patch 3.3, Resto druids saw a change to the Gift of the Earthmother talent - it used to increase total spell haste by 20% (it now only increases it by 10%). Suddenly, druids needed a lot more haste in order to reduce the global cooldown to one second.
Using a spec like the one I use, you need approximately 850 haste to reach a one second global cooldown. If you’re low on haste, or prefer to gem only spellpower (see Gear, Gems and Enchants), you may prefer to use a spec which takes 18 points in the Balance tree.
Here is a typical example of the 18/0/53 spec used; here's a 18/0/53 which puts points in Empowered Touch.

I used a similar spec when 3.3 first dropped (though I opted to take points out of Revitalise rather than Empowered Touch) until I got enough haste from gear and gems. Running a spec like this you can get away with approximately 750 haste. The key difference is the 3 points spent in Celestial Focus in the Balance tree. Those 3 points increase your total spell haste by 3%. You also need to spend one extra point in Balance to reach the tier to get CF. One point in either Brambles or Nature's Reach would suffice... Brambles is nice as, if you're consistent in throwing Thorns on your tanks, the little bit of increase in damage from the thorns is nice. Nature's Reach only increases the range of your Balance spells and faerie fire, so not automatically useful, as you're not likely to be dpsing while healing (at least not until you overgear the content, anyway). Still, you might like to throw a faerie fire up on a boss or maybe you need to smack a Kinetic Bomb with a moonfire - the bit of extra range might be nice in those cases.
Lastly, glyphs!
Glyph of Swiftmend: Absolutely crucial for any tree! This glyph stops your Swiftmend from consuming the HoTs on the target, so your Rejuvs and Regrowths will remain on the target. It’s also very important because you can Swiftmend targets that have other druid’s HoTs rolling on them - other trees will not be pleased if you’re getting rid of all their HoTs when swiftmending!
Glyph of Wild Growth: This glyph increases the amount of targets your Wild Growth hits, from 5 to 6. I consider this to be a must-have for raids, particularly in 25mans, as it gives that much more cover over the raid. 10mans it could be arguably replaced with a different glyph, but I still find it very useful. The only time I’d say it’s unnecessary would really be just if you’re -only- healing 5 man dungeons, as at that point the extra Wild Growth would probably only be hoppng onto pets.
Glyph of Nourish: This glyph causes your Nourish spell to heal for an additional 6% for every HoT that is on the target. I think this is an excellent glyph - Nourish is already boosted by 20% if a HoT is on the target, and this glyph boosts it even more, making it an excellent heal. 
Those are the three major glyphs I currently use.
Glyph of Rapid Rejuvenation: I have mixed feelings about this glyph. What it does is it increases the haste of your Rejuv - so, the Rejuv heals will tick faster, BUT, your rejuvenation will end faster. I tend not to use this glyph, mainly as it messes with my healing style - I dislike that the Rejuvs end faster, as it effects my covering of the raid and I find makes it more difficult to use them as a preventive measure. 
Given haste will inherently effect HoT and DoT ticks (without reducting their duration) in Cataclysm, this glyph will become redundant in the future.
For Minor Glyphs, the only one I think is a necessity for any druid is the Glyph of Unburdened Rebirth. It allows your Rebirth to be cast without needing a reagent. This is crucial - it ensures you will never have a moment where someone needs a battle rez and you can’t because you didn’t top up your reagent stash.
The other two minor glyphs are pretty much up for grabs. I like the Glyph of the Wild, which just reduces the mana cost of Gift. This can be useful if someone is battle rezzed and they need to be rebuffed mid-fight, it won’t cost you too much mana to buff them. I also like Glyph of Dash, which reduces the cooldown on your Dash ability. Mainly useful in fights where you need to quickly shift to cat form and dash away from something, it’s nice for that cooldown to be ready sooner in case you need to do so again.
That’s all on specs and glyphs for now. Be sure to check out Spells and Strategies and Gear, Gems and Enchants


You can see the full guide altogether on the Guide to Healing page! I will try to keep that page updated with new patches and expansions along with the usual posts about changes on the normal blog.